
🗺️ Texture Mapping & UV Unwrapping
TL;DR: Texture Mapping is the technique of “applying” 2D images onto the surface of 3D models to create colors and surface details without adding polygons. UV Unwrapping is the prerequisite step — “peeling” the 3D model into a flat map to precisely determine which part of the texture goes where on the mesh.
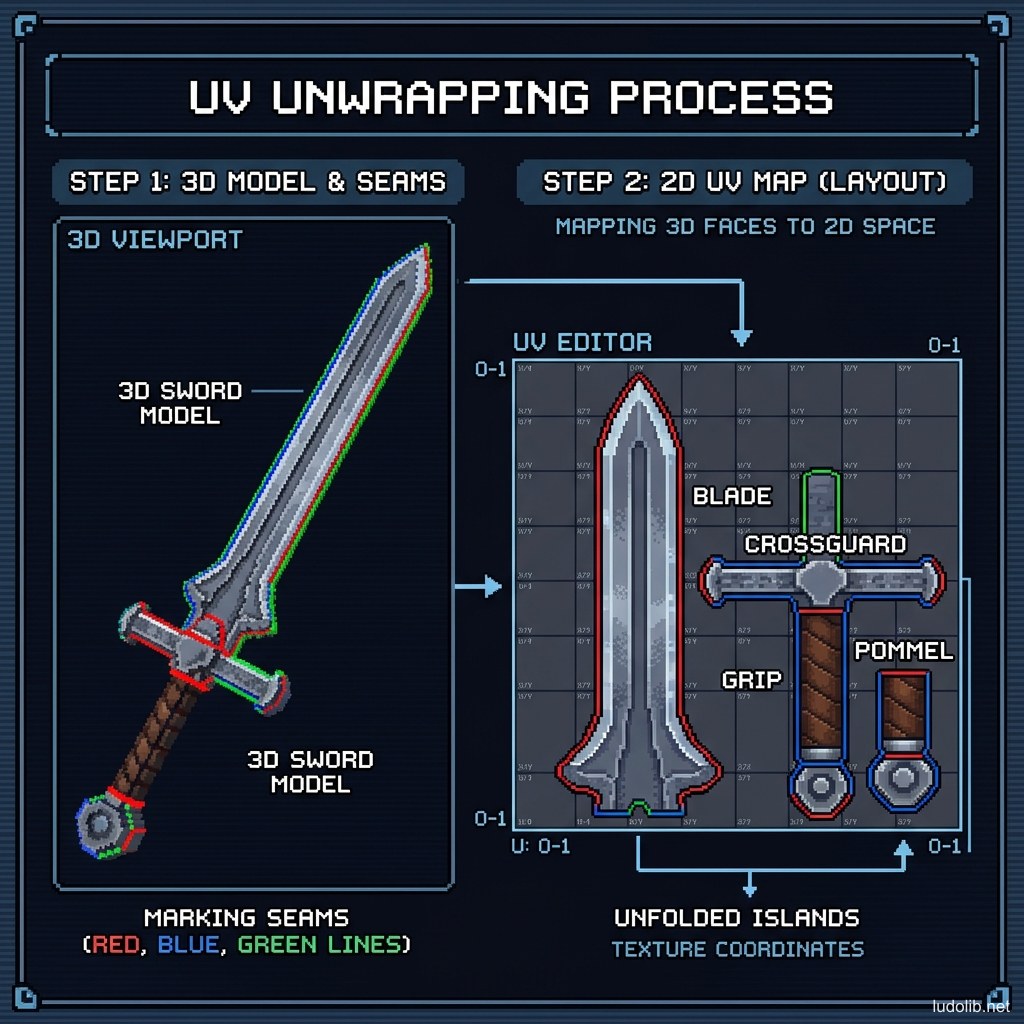
Think of an orange: peel it, cut it in the right places and spread it flat on a table — that’s UV Unwrapping. Then, any image printed on that flat orange peel will automatically appear in the correct position on the original 3D orange. This technique is the foundation of every 3D model in games — from characters to environments, weapons to architecture.
Core Concepts
| Term | Definition |
|---|---|
| UV Coordinates | 2D coordinates (U = horizontal axis, V = vertical axis) determining where on the texture each mesh vertex corresponds to |
| UV Island | An independent UV piece after unwrapping — each piece is a portion of the mesh laid flat |
| UV Seam | A cut line on the mesh to allow flat unfolding without distortion — like clothing seams |
| Texel Density | Texture pixel density per unit of surface area — the more uniform the better |
| Texture Atlas | Multiple UV islands from multiple objects packed into a single texture file to optimize GPU |
Operating Principles
Texture Map Types in PBR Pipeline
A complete 3D model in modern games typically needs this set of texture maps [S1]:
| Map | Role | Note |
|---|---|---|
| Albedo / Base Color | Basic surface color | Contains no light or shadow information |
| Normal Map | Simulates surface details (scratches, pores) | Each pixel is a normal direction vector |
| Roughness Map | Surface roughness/glossiness (0 = mirror, 1 = sand) | Affects how light reflects |
| Metallic Map | Distinguishes metal vs. non-metal | Binary is often more effective than smooth grayscale |
| AO (Ambient Occlusion) | Darkness in crevices and corners | Usually baked from high-poly model |
| Emissive Map | Self-illuminating zones | Screens, LED lights, glowing magic |
Texel Density and LOD
To avoid texture being blurry in one spot and sharp elsewhere on the same character, the standard pipeline requires uniform Texel Density — typically 512 or 1024 pixels/meter [S2]. Important areas (character face) can be given higher texel density by allocating more UV space in the atlas.
UV Seam Placement — Hiding the Stitches
Seams are unavoidable but can be hidden in less visible positions: underneath arms, behind the head, along natural clothing seams. Experienced artists place seams based on both factors — technical (least distortion) and aesthetic (least visible) [S1].
Game Examples
- The Witcher 3 (CD Projekt Red) — Geralt’s character texture atlas uses 4K resolution for body, 2K for secondary accessories — with texel density carefully calibrated so the face is always sharper.
- Minecraft (Mojang) — Extreme opposite case: each cube face is just a 16x16 pixel tile in the shared texture atlas — the simplest possible UV Unwrap, but perfectly uniform.
- God of War (Santa Monica, 2018) — Uses “Texture Streaming” technique — only loads the portion of the texture atlas corresponding to the area the camera is currently viewing, avoiding VRAM usage for the entire texture simultaneously [S2].
Trade-offs
| Aspect | Content |
|---|---|
| ✅ Advantages | Creates very high visual detail without costing polygons. One texture atlas can serve multiple different LOD versions of the same model. |
| ❌ Disadvantages | Poor UV Unwrap creates texture stretching (pattern distortion) that’s very hard to fix later. Seams show on flat surfaces or surfaces with linear patterns. |
| ⚠️ Common Pitfall | ”UV Overlap” — two islands overlapping in UV space will share the same texture area — causing baking errors and lighting artifacts. Always check for overlaps before baking. |